This weekend I spent some time adding electrical goodies to my ’95 Honda VFR 750 Interceptor. There are some known electrical gremlins on this bike, so I wanted to add a voltage monitor and a powerlet outlet for my heated gear for the winter. I can also use the outlet to power other goodies, like a GPS or even charge my phone in the tank bag.
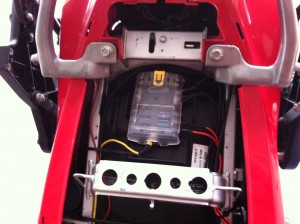
To keep it all clean I purchased a six-circuit Blue Sea Systems Fuse Block (link to this and other products below from Amazon) from West Marine and a generic 12v automotive relay from the local NAPA store. I like the Blue Sea block because it’s a quality unit, has a central negative bus and keeps the wiring neat, plus each circuit is individually fused. This really cleans up the wires going to the battery, and allowed me to use a relay between the battery and fuse block to so that anything powered through the block only comes on when the key is turned (switched power).
 It had been a few years since I’d wired up a relay, so I used the helpful instructions on the Canyon Chasers web site, here. That saved me a lot of time. I put the fuse block at the tail end under the seat, which means longer runs of wiring, but a clean install and easy to access if needed. I tapped the license plate wire as the switched power source to trigger the relay and did frequent tests with a voltmeter at each step of the process.
I have the relay down closer to the battery, where the tool pouch normally goes. I may re-locate this at some point outside the frame near the r/r — not sure yet.
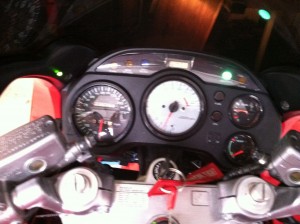
Next up was adding a Signal Dynamics heads-up voltmeter. This is a tri-color LED that emits a color selection based on the amount of voltage at the battery. The short version is that if your battery isn’t getting a charge, you get a warning. Green means all is good. I wanted to mount the LED where I could see it without looking around too much, but also have it somewhat unobtrusive. I considered the side fairings, and also directly in the dash, and was thinking about the right side of the dash.  Then I started taking the front fairing off and a few steps into the process realized the left inside of the wind screen area, near the mirror stalk support, would be out of the way, yet visible. And a LOT easier to get to. So that’s where it ended up — beside the front screw on the left side cover. You can se
The LED mounts through a 1/4 inch hole and although it’s really bright in this photo, it’s actually not annoyingly so. It’s on the left. The other bright blue light is the neutral light, which is also reflecting in the wind screen.
The control unit is under the fairing on the left side, and the wires run back from there to the fuse block. The last project for the weekend was adding a powerlet outlet. These 12v outlets are great for heated gear (Widder vest, sleeves and vest), GPS units and other powered goodies. They have a strong junction that’s perfect for mobile environments. It has a water-resistant spring loaded cover, and I actually had this one from a former bike. I have another that hangs out from under the seat if needed for a passenger’s gear, or powering something else.
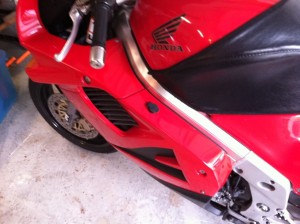
 There is a nice trick install right in the steering head stem, but I wanted to avoid my vest connection wire running across the tank and flapping around. Ideally for me is near my left knee, as that’s the side where the vest connection is, and I’ve had outlets in that area on every other bike. It’s helpful for mounting/dismounting while you’re still plugged in, too. I considered farther up, but was concerned about the cord interfering with turning the bars. After some experimenting with placement, I picked a spot in the middle left fairing, checked for clearance underneath and drilled out the hole.
Actually I started with the smallest drill bit I have, and built my way up (tape covered the area I was drilling, going very slowly, until I had a large enough opening to get my dremel “drum sander” attachment in the hole and could slowly enlarge it. This was the longest part of the install, because I didn’t want to crack or stress the fairing. After getting it installed, building and running some wiring looms for both and checking the switched power, I got it all buttoned up and looking good. Of course I hope I don’t need the heated vest anytime soon!
[iframe src=”http://rcm.amazon.com/e/cm?t=kaytom-20&o=1&p=8&l=as1&asins=B000THQ0CQ&nou=1&ref=tf_til&fc1=000000&IS2=1<1=_blank&m=amazon&lc1=0000FF&bc1=000000&bg1=FFFFFF&f=ifr” style=”width:120px;height:240px;” scrolling=”no” marginwidth=”0″ marginheight=”0″ frameborder=”0″]
[iframe src=”http://rcm.amazon.com/e/cm?lt1=_blank&bc1=000000&IS2=1&bg1=FFFFFF&fc1=000000&lc1=0000FF&t=kaytom-20&o=1&p=8&l=as4&m=amazon&f=ifr&ref=ss_til&asins=B00AC5J84M” style=”width:120px;height:240px;” scrolling=”no” marginwidth=”0″ marginheight=”0″ frameborder=”0″]
[iframe src=”http://rcm.amazon.com/e/cm?t=kaytom-20&o=1&p=8&l=as1&asins=B00206ENP0&nou=1&ref=tf_til&fc1=000000&IS2=1<1=_blank&m=amazon&lc1=0000FF&bc1=000000&bg1=FFFFFF&f=ifr” style=”width:120px;height:240px;” scrolling=”no” marginwidth=”0″ marginheight=”0″ frameborder=”0″]